Click Here For Free Blog Templates!!!
Blogaholic Designs
Wednesday, August 12, 2015

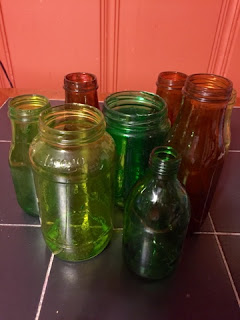
Adventures in Upcycling: Coloring Glass Jars

I have been saving up all manner of jars with the idea of using them as a center piece for our dining table. I had no real idea what it would be but I knew jars would be involved. I saved Starbucks frapacinno jars, spaghetti jars, small Canada Dry bottles, and pickle jars. 
Once I had a good number I searched around to find the best and easiest ways to color them. These two points converged in a modpodge and food coloring craft. 
I will lay it out for you!!
Add enough modpodge to the jar to be able to cover the interior of the jar.  Mix food coloring in the modpodge and rotate the jar until the whole inside is covered.
On a counter lay out some newspaper or napkins and let the jars dry upside down for about an hour. 
Then set them right side up in a baking sheet and bake for an additional hour in a warm oven, 250-300, until the are nice and clear with no streaks. 


What really made the project sing was the rope. I wrapped the rope and secured it with hot glued three bottles at a time together. It will make it much easier to move them off the table when I need more room. 

Hot glue, the handy crafter's secret weapon!!


Saturday, August 8, 2015

Adventures in Upcycling : Can planters


Fun garden DIY to start off the week!


I absolutely love this low cost way to jazz up a boring old fence. 
 
We use a lot of the jumbo sized tomato sauce and green beans cans, so it was not too much trouble to wash them out and save them up. It took a few weeks of yelling "Stop! don't pitch that can!" and only a few dives into the kitchen trash can to get enough for the fence.
 
Once you have amassed enough cans simply add a little spray paint and screw them randomly onto the fence and pick out some flowers. I chose a variety of annual flowers and a couple annual vines to add more depth once they get growing.
 
A Low cost and low effort DIY with a big payoff. 
 
Bonus: 
Froggy in the milk flowers! 
I know, I know! Really over done and soooo last year, but I love it all the same. 


Monday, August 3, 2015

Starting the School Year Right!

I am causing my normally type B personality to question itself with all the Type A preplanning I am accomplishing! I have up to week 7 of Classical Conversations notebooking pages created and have my new "busy work binders" ready and raring to go.
I have been doing extensive Mommy Blog research this summer and we are going to try out notebooking this year and incorporating them into, what I am calling, a Busy Work Binder.

You have questions? Well let me will elaborate!

Notebooking is pretty well know in homeschool circle, by here is the Readers Digest version for any newbies. Using a notebook, or binder in my case, students write out what they are learning and use color pages, matching, magazine clippings or their own illustrations to cement the concepts they notebooked.

Ta-Da notebooking in under 35 words!

I am endeavoring to combine notebooking with the Rise and Shine binder. What is a Rise and Shine binder? A fun learning tool I discovered at The Internet Mothership, aka Pinterest.

Here is a link to an example of these type binders that I am rebranding Busy Work Binder!
http://tunstalltimes.blogspot.com/
A few more pages that I am incorporating:
firstgradebrain.com
teacherspayteachers.com
teacherspayteachers.com/

Here are a few of my pages


Hopefully these little puppies with help out when I need to focus on one kid at a time. My master plan is to have one kiddo work on the laminated pages and learning aids (math flash cards, letter cards and the like) while I work on math and/or reading with the opposite kiddo. Then we will work on the notebooking pages together during our CC memory work time.

I will track my data when the school year begins and keep you abreast (awesome word)